JetpackCompose Navigation


This is a Kotlin Multiplatform project targeting Android and iOS where I will showcase Jetpack Compose as the app navigation. Since the navigation is moved from Android to multiplatform project we definitely should give it a try link.
Assumptions:
– Application should allow us to navigate from one screen to another.
– Application should allow to pass some parameters from first to second screen.
– Application should handle the screen rotation without loosing data.
– Application should handle the Tab Navigation.
– Application should handle the async operations with coroutines.
In the next posts I will also cover the Voyager, Appyx and Decompose navigation libraries.
The project:
Note:
The recent release of JetpackNavigation addsSafe Argswhich is a convenient way of defining routes with usage of Kotlin Serialization – but it’s not available yet in compose multiplatform1.6.11. I hope it changes soon, but for now we need to define routes as plain strings.
05.07.2024 edit:
Good news are that the new update of compose multiplatform is available. The version1.7.0-alpha01that brings theSafe Args!
Base project setup as always is made with Kotlin Multiplatform Wizard, we also need to add some navigation-compose as it is the core thing that we would like to examine, according to the documentation we should use navigation in version 2.8.0-alpha08 and kotlinx.serialization.
libs.versions.toml
[versions]
compose-plugin = "1.7.0-alpha01"
navigation-compose = "2.8.0-alpha08"
serialization = "1.6.3"

[libraries]
navigation-compose = { module = "org.jetbrains.androidx.navigation:navigation-compose", version.ref = "navigation-compose" }
serialization-json = { module = "org.jetbrains.kotlinx:kotlinx-serialization-json", version.ref = "serialization" }

[plugins]
jetbrainsCompose = { id = "org.jetbrains.compose", version.ref = "compose-plugin" }
kotlinSerialization = { id = "org.jetbrains.kotlin.plugin.serialization", version.ref = "kotlin" }
Freshly added dependencies needs to be synced with the project and added to the build.gradle.kts
plugins {
    alias(libs.plugins.kotlinSerialization)
}

sourceSets {
    commonMain.dependencies {
        ...
        implementation(libs.navigation.compose)
        implementation(libs.serialization.json)
    }
}
Linear Navigation
Getting started. The question is how do the navigation know where to go – it’s simple, every destination has its own unique identification that defines current screen. The destination in most cases will be a composable function that will be displayed on the screen.
Note:
In previous versions of navigation the route was defined as a string (you can think of it as the URL address). But now we have more robust approach where we can pass an Object/Class/KClass as a destination as log as they are serializable.
Let’s start with the Screen sealed class that will hold the destinations.
@Serializable
sealed class Screen {
    @Serializable
    data object First : Screen()

    @Serializable
    data object Second : Screen()
}
Now we can create the Navigation composable function. Which will hold the NavHost and navigationController. The NavHost is the container for displaying the current destination and the navigationController is the object that manages the navigation between destinations (screens). The last thing is the NavGraph that maps composable destinations and routes.
@Composable
fun Navigation() {
    val navController = rememberNavController()

    NavHost(
        navController = navController,
        startDestination = Screen.First,
    ) {
        composable<Screen.First> {
            FirstScreen(navController)
        }

        composable<Screen.Second> {
            SecondScreen(navController)
        }
    }
}
With the navigation frame built we should implement some screens. The First screen will be really simple with a single button that will navigate to the Second screen. The Second screen will be also simple with a button that will navigate back.
@Composable
fun FirstScreen() {
    Column(
        modifier = Modifier.fillMaxSize(),
        horizontalAlignment = Alignment.CenterHorizontally,
        verticalArrangement = Arrangement.Center
    ) {
        Text("First screen")
        Button(onClick = { /*TODO navigate to the second screen*/ }) {
            Text("Second Screen")
        }
    }
}
@Composable
fun SecondScreen() {
Column(
modifier = Modifier.fillMaxSize(),
horizontalAlignment = Alignment.CenterHorizontally,
verticalArrangement = Arrangement.Center
) {
Text("Second screen")
Spacer(modifier = Modifier.height(16.dp))
Button(onClick = { /*TODO navigate back to first screen*/ }) {
Text("Go Back")
}
}
}Now, let’s fill the gaps in Navigation() function with created screens. We left some TODOs in the screens. If we want to navigate from screen to screen we need to pass the navConroler as an input to our composable and then call navigate() method and popBackStack() to go back.
Button(onClick = { navController.navigate(Screen.Second) }) { Text("Second Screen") }Button(onClick = { navController.popBackStack() }) { Text("Go Back") }With the initial setup made, all that left is to use Navigation() function in the application entrypoint. The MainActivity.kt for android and for iOS it is the MainViewController.kt.
class MainActivity : ComponentActivity() {
    override fun onCreate(savedInstanceState: Bundle?) {
        super.onCreate(savedInstanceState)

        setContent {
            Navigation()
        }
    }
}
fun MainViewController() = ComposeUIViewController { Navigation() }After running the application we should see the First scree with a button that navigates to the Second screen and a button that navigates back to the First screen.
Passing parameters
Note:
Now with Safe Args passing values is easy, but with the previous release passing arguments was tricky. Since the route looks like the URL address required arguments should be passed as apathin route and the optional asquery
With the Safe Args we can pass parameters as the part of the destination object which is easy and convenient, there are two types of arguments required and optional
Required Arguments
@Serializable
sealed class Screen {
    ...
    @Serializable
    data class Third(val greeting: String) : Screen()
}
Now we need to create the ThirdScreen composable function that will accept the greetings parameter and provide a way to pass the arguments. Since the composable<T>() is a typed function where T is route from a KClass for the destination we can use the .toRoute<T>() function. This extension function returns route as an object of type T. From now, we can extract the arguments from the passed class. and as we know what type of the class it is we also know what type the arguments are.
Note:
BeforeSafe Argswe needed to useNavArgumentBuilderand explicit define the type of the argument and the key for the argument.
composable(
  route = Screen.ThirdScreen.route,
  arguments = listOf(navArgument("greetings") { type = NavType.StringType }
) {
     ThirdScreen(navController, it.arguments?.getString("greetings").orEmpty())
 }
And you can clearly see that it was a mess.
@Composable
fun Navigation() {
    NavHost(...) {
        ...
        composable<Screen.Third> {
            val args = it.toRoute<Screen.Third>()

            ThirdScreen(
                navController = navController,
                greetings = args.greeting
            )
        }
    }
}
Since we know that the passing argument is a String we can extract it from the route and pass it to the Third screen composable.
Let’s modify the First screen to navigate to the Third screen with the greetings’ parameter as an argument of the data class.
@Composable
fun FirstScreen(navController: NavHostController) {
    ...
    Button(
        onClick = {
            val greetings = "Hello from First Screen"
            navController.navigate(Screen.Third(greetings))
        }
    ) {
        Text("Third Screen")
    }
}
The Third screen should be built in a same way as the Second screen but with a proper parameters passed.
@Composable
fun ThirdScreen(navController: NavHostController, greetings: String) {
    Column(
        modifier = Modifier.fillMaxSize(),
        horizontalAlignment = Alignment.CenterHorizontally,
        verticalArrangement = Arrangement.Center
    ) {
        Text("Third screen")
        Spacer(modifier = Modifier.height(16.dp))
        Text("Greetings: $greetings")
        Spacer(modifier = Modifier.height(16.dp))
        Button(onClick = { navController.popBackStack() }) {
            Text("Go Back")
        }
    }
}Optional Arguments
For optional arguments we will follow same idea as with required arguments.
Note :
With theSafe Argsit’s easy to pass optional arguments. In previous versions we needed to usequeryparameters. Where arguments should be passed in therouteand preceded by a?character following the pattern?key=value, and if you want to pass multiple optional parameters they have to be separated with&character?key1=value1&key2=value2. Also, the optional parameters has to be provided with the default value
Let’s create the Fourth screen that will have two optional arguments name and surname.
@Serializable
data class Fourth(val name: String, val surname: String? = null) : Screen()
Now we need to create the Fourth screen composable function that will accept the name and surname parameters.
composable<Screen.Fourth> {
    val args = it.toRoute<Screen.Fourth>()

    FourthScreen(
        navController = navController,
        name = args.name,
        surname = args.surname
    )
}
The FourthScreen should be built in a same way as ThordScreen with proper parameters passed.
@Composable
fun FourthScreen(navController: NavHostController, name: String, surname: String?) {
    ...
}
The FourthScreen should be built in a same way as ThordScreen with proper parameters passed.
@Composable
fun FourthScreen(navController: NavHostController, name: String, surname: String?) {
    ...
}
Navigation is as simple as it can possibly be:
fun FirstScreen(navController: NavHostController) {
    Button(onClick = { navController.navigate(Screen.Fourth(name = "John", surname = "Doe")) }) {
        Text("John Doe Screen")
    }

    Button(onClick = { navController.navigate(Screen.Fourth(name = "Michael")) }) {
        Text("Michael Screen")
    }
}Nested Navigation
In case of complex applications splitting navigation into smaller parts is a good idea. Currently, we have one NavHost with all screens originating from the same place. We can divide the navigation into smaller parts that will be encapsulated according to their purpose. Let’s create a Fifth and Sixth screen that will separate from main navigation and will be accessible only from the Third screen. The graph for such screens will look like this:
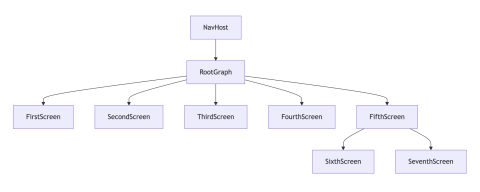
With such structured navigation we can easily manage the navigation and the screens. We can create a NestedNavigation composable function that will hold the NavHost and navigationController for the nested navigation. When we close the Third screen navigation will remove all its children from the backstack and they won’t be accessible anymore. It’s a great tool for structuring processes in the application – when a process is finished (for example a signup, a payment or a tutorial).
If you read my post about navigation Decompose you can see similarities in the approach. In Decompose every component can have its own stack and manage it.
Adding the nested navigation graph is done by using the navigation() function in the NavHost composable. The navigation() function takes the startDestination and the route. The route is a unique name (or object) of the nested navigation graph to distinguish it from other graphs. The startDestination is the screen that will be displayed when the nested graph is opened.
@Serializable
sealed class Route {
@Serializable
data object Root : Route()
@Serializable
data object Main : Route()
@Serializable
data object Nested : Route()
}
@Composable
fun Navigation() {
NavHost(
navController = navController,
startDestination = Screen.First,
route = Route.Root::class
) {
...
navigation(
startDestination = Screen.Fifth,
route = Route.Nested::class
) {
composable<Screen.Fifth> {
FifthScreen(navController)
}
composable<Screen.Sixth> {
SixthScreen(navController)
}
composable<Screen.Seventh> {
SeventhScreen(navController)
}
}
}
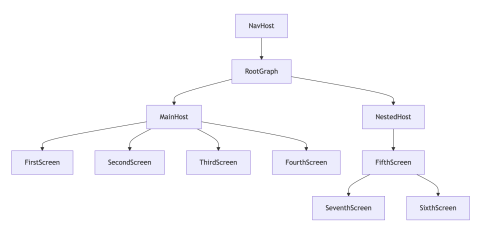
}To clarify the navigation we can split the Navigation() function into separate components, first will handle maibgraph and second the nested graph. To do so we need to create extension functions for NavGraphBuilder that will hold specific screens which will result in such graph changes:
fun NavGraphBuilder.nested(navController: NavHostController) {
    navigation(
        startDestination = Screen.Fifth,
        route = Route.Nested::class
    ) {
        // code for nested navigation
    }
}
fun NavGraphBuilder.main(navController: NavHostController) {
navigation(
startDestination = Screen.First,
route = Route.Main::class
) {
// code for main navigation
}
}@Composable
fun Navigation() {
val navController = rememberNavController()
NavHost(
navController = navController,
startDestination = Route.Main,
route = Route.Root::class
) {
main(navController)
nested(navController)
}
}fun FirstScreen(navController: NavHostController) {
...
Button(onClick = { navController.navigate(Route.Nested) }) {
Text("Nested")
}
}With such changes we still can navigate between graphs. There is no problem calling the Fourth screen from nested graph. Let’s try to achieve that by adding a way for the Sixth screen to open a Fourth screen.
@Composable
fun SixthScreen(navController: NavHostController) {
    ...
    Button(onClick = {
        navController.navigate(Screen.Fourth("John", "Doe")) {
            Text("John Doe Screen")
        }
    }
We can now modify the Fourth screen and add a button that will navigate back to MAIN graph instead of the popping back the stack, so we can close the NESTED graph immediately and dispose all its children screens from the backstack. The navigate() builder has a popUpTo() method that allows to remove the destinations from the backstack. We can pass the destination to which we want to pop back to. There is also the inclusive parameter to remove the passed destination from the backstack as well.
@Composable
fun FourthScreen(...) {
    ...
    Button(
        onClick = {
            navController.navigate(Route.Main) {
                popUpTo(Route.Main)
            }
        }
    ) {
        Text("MAIN")
    }
}
We can close the NESTED graph even quicker, while opening the Fourth screen from the Sixth all we need to do is use popUpTo() method with the ROUTE.NESTED parameter.
@Composable
fun SixthScreen(...) {
    ...
    Button(onClick = {
        navController.navigate(Screen.Fourth("John", "Doe")) {
            popUpTo(Route.Nested)
        }
    }) {
        Text("John Doe Screen")
    }
}
You can mix the functions as much as you want to achieve desired behaviour, for example you can pop screen before entering a new one, drop whole graphs and more – it’s a flexible solution.
Bottom Navigation
Yet another thing that is widely common in mobile apps nowadays is the bottom navigation. Let’s extend the project with one more feature! We need to add three new screens. Eighth screen which will be the main screen that holds bottom menu, and it’s a container for the tabs: Ninth screen and Tenth screen. Inside the Eighth screen we will add a new NavHost that will build its own graph and will handle switching tabs. We will be also using the BottomNavigation jetpack compose control to create the bottom bar view and it’s items.
@Composable
fun EighthScreen() {
    val navController = rememberNavController()

    Scaffold(
        modifier = Modifier.fillMaxSize(),
        bottomBar = {
            // TODO: add bottom navigation
        },
    ) { innerPadding ->
        NavHost(
            modifier = Modifier.padding(innerPadding),
            navController = navController,
            startDestination = Screen.Eighth.Tab.Home,
        ) {
            composable<Screen.Eighth.Tab.Home> {
                NinthScreen()
            }

            composable<Screen.Eighth.Tab.Edit> {
                TenthScreen()
            }
        }
    }
}
The nev NavHost has its own navController and startDestination. When we enter the screen the item displayed as a first tab will always be the Ninth screen. The local navController is used to navigate between tabs. The BottomNavigation control its quite helpful. It will render the bottom bar with necessary elements such as icon, label and selected state, and even adds slight dim to the selected item. But to do so we need to provide the information about the tabs. Like in every other type of navigation the displayed screens need their own route/destination, so we can to create a new sealed class for the tabs inside current Screen.ktfile.
@Serializable
sealed class Screen {
    ...
    @Serializable
    data object Eighth : Screen() {
        @Serializable
        sealed class Tab(val icon: ICON, val label: String) : Screen() {
            @Serializable
            data object Home : Tab(icon = ICON.HOME, label = "Home")

            @Serializable
            data object Edit : Tab(icon = ICON.EDIT, label = "Edit")

            @Serializable
            enum class ICON {
                HOME, EDIT
            }
        }
    }
}
Now we can create the bottom navigation tabs.
@Composable
private fun BottomBar(navController: NavHostController) {
    val tabs = listOf(
        Screen.Eighth.Tab.Home,
        Screen.Eighth.Tab.Edit,
    )

    val backstackEntry by navController.currentBackStackEntryAsState()
    val currentDestination = backstackEntry?.destination

    BottomNavigation {
        tabs.forEach { tab ->
            TabItem(tab, currentDestination, navController)
        }
    }
}
The BottomBar is a composable function responsible for handling the elements inside tabs container. We need to specify the elements (in our case tabs) that are available in the bottom bar. We are also using the currentBackStackEntryAsState() to get the current destination – the value is updated with every navControler changes due to navigate() or pop() functions calls which are triggering the recomposition. As a result the top entry on the backstack is returned – so we will know what is currently displayed, and we can retrieve the destination that contains information about the screen.
The BottomNavigation control takes a few parameters, and the last one is the content: @Composable RowScope.() -> Unit which will be responsible for creating the bottom navigation view. For each tab that we want to display we should create proper UI element. We can create an extension function for RowScope that will be responsible for providing the BottomNavigationItem for each tab.
@Composable
private fun RowScope.TabItem(
    tab: Screen.Eighth.Tab,
    currentDestination: NavDestination?,
    navController: NavHostController,
) {
    BottomNavigationItem(
        icon = { Icon(imageVector = tab.icon.toVector(), contentDescription = "navigation_icon_${tab.label}") },
        label = { Text(tab.label) },
        selected = currentDestination?.hierarchy?.any { it == tab } == true,
        onClick = {
            navController.navigate(tab) {
                navController.graph.startDestinationRoute?.let { popUpTo(it) }
                launchSingleTop = true
            }
        },
    )
}

// helper function for transforming enum to vectorIcon
private fun Screen.Eighth.Tab.ICON.toVector() = when (this) {
    Screen.Eighth.Tab.ICON.HOME -> Icons.Default.Home
    Screen.Eighth.Tab.ICON.EDIT -> Icons.Default.Edit
}
The selected state is calculated by checking if the current destination is the same as the tab the current item. The onClick action is responsible for navigating to the clicked tab.
Since we want only one active screen inside the tabs container we need to pop it. This will cause dropping other element from the back stack. We can also add the launchSingleTop which will ensure that the tab is not preserved, and will be recreated with every click.
Last thing to do is to add an entrypoint in the main graph.
fun NavGraphBuilder.main(navController: NavHostController) {
    ...
    composable<Screen.Eighth> {
        EighthScreen()
    }
}
@Composable
fun FirstScreen(navController: NavHostController) {
...
Button(onClick = { navController.navigate(Screen.Eighth) }) {
Text("Bottom")
}
}Async Operations
The last thing that we will cover are this post is async operations. Previously discussed navigation libraries (Decompose, Appyx, Voyager) provided they own business logic container object where async operation can be handled. In the case of JetpackCompose we will be using ViewModels that recently were moved to compose multiplatform library. Please keep in mind that Appyx and Voyager still allow to use ViewModels if you want to do so.
First thing to add is the proper dependency according to the documentation.
[versions]
common-viewmodels = "2.8.0"

[libraries]
viewmodels-compose = { module = "org.jetbrains.androidx.lifecycle:lifecycle-viewmodel-compose", version.ref = "common-viewmodels" }
commonMain.dependencies {
...
implementation(libs.viewmodels.compose)
}The general usage of the ViewModel is quite simple and similar to the android approach. We need to create a class that extends the ViewModel and then put the logic there. The ViewModel offer us a viewModelScopewhich is a CoroutineScope that is bound to the lifecycle of the ViewModel. It means that when the ViewModelis destroyed all the coroutines that are launched in the viewModelScope will be cancelled. Therefore, we can easily use it to handle the async operations.
Let’s create a simple ViewModel that will handle the countdown timer and corresponding Eleventh screen for displaying the values.
class EleventhViewModel : ViewModel() {
    private val _countDownText = MutableStateFlow("")
    val countDownText: StateFlow<String> = _countDownText.asStateFlow()

    init {
        viewModelScope.launch {
            for (i in 10 downTo 0) {
                _countDownText.value = i.toString()
                delay(1000)
            }
        }
    }
}
To use the ViewModel we can use the viewModel function that is provided by the lifecycle-viewmodel-compose library. The function returns existing view model or creates new one in the scope. The crated ViewModel is bound to the viewModelStoreOwner and will be retained as long as the scope is alive.
The source code of the Eleventh screen is quite simple and looks as all previously created screens.
@Composable
fun EleventhScreen(
    navController: NavHostController,
    viewModel: EleventhViewModel = viewModel { EleventhViewModel() },
) {
    Column(...) {
        ..
        Countdown(viewModel)
    }
}

@Composable
private fun Countdown(viewModel: EleventhViewModel) {
    val countdownText = viewModel.countDownText.collectAsState().value
    Text("COUNTDOWN: $countdownText")
}
After adding the created screen to the navigation, we can launch it from the First screen end examine the countdown functionality.
Summary
In this post we covered the basics of the JetpackCompose navigation. The library is well documented and for sure you will find a lot of posts/videos and other resources that will help you to understand the navigation better. The JetpackCompose navigation is a powerful tool that allows you to create complex navigation structures with ease. The library was available for android for a long time, and now it’s available for multiplatform projects. The multiplatform version of the library is still in alpha version, but in my opinion It’s ready to use in production. The library is a great choice for developers who want to create modern and complex navigation structures in their applications.
In my previous posts I covered the Decompose, Appyx, Voyager navigation libraries. Now I can say that my personal favourite is the JetpackCompose navigation as it will be the most popular and widely used in the future, with great support from the community and the Jetbrains team. The Compose Multiplatform is growing rapidly, and I’m sure that in the near future we will see a lot of great libraries and tools that will help us to create modern and complex applications. But all of them are great, and you should choose what fits your needs the best.
When I started to write post about Fullstack Kotlin Developer I was thinking about the navigation library that I will use in the project. As there were no official/suggested way of handling the navigation in the multiplatform project I chose the Decompose library, but after the adoption of the JetpackCompose navigation, and the Viewmodels to Compose Multiplatform I would definitely recommend it as the best choice your project, and I’m sure that I will use it in all of my future projects as well.