Creating a custom Android Studio Plugin


In Android app development, saving time and simplifying tasks is critical. We’re always looking for ways to work smarter, not harder. One great way to do this is by creating custom plugins for Android Studio. In this blog post, we’ll explore the world of plugin development. We aim to make Android Studio even more helpful by adding handy emulator options to the sidebar. We can speed up our development or testing process by customizing Android Studio to suit our needs. Let’s explore how building a custom IntelliJ plugin can supercharge your productivity.
The plugin will include the following features:
- A keyboard shortcut-triggered action to toggle the “debug view,” which activates or deactivates the “show layout bounds” option on emulators,
- A keyboard shortcut-triggered action to toggle dark mode on emulators,
- A sidebar panel for controlling:
- Font size,
- Display size,
- Animation speed,
- HWUI rendering profiler bars visibility,
- Debug view and dark mode mentioned before,
All of the mentioned options are available on the devices already, but searching for them, and then switching back to the application you are working on can be time-consuming. Using the sidebar button should be more handy.
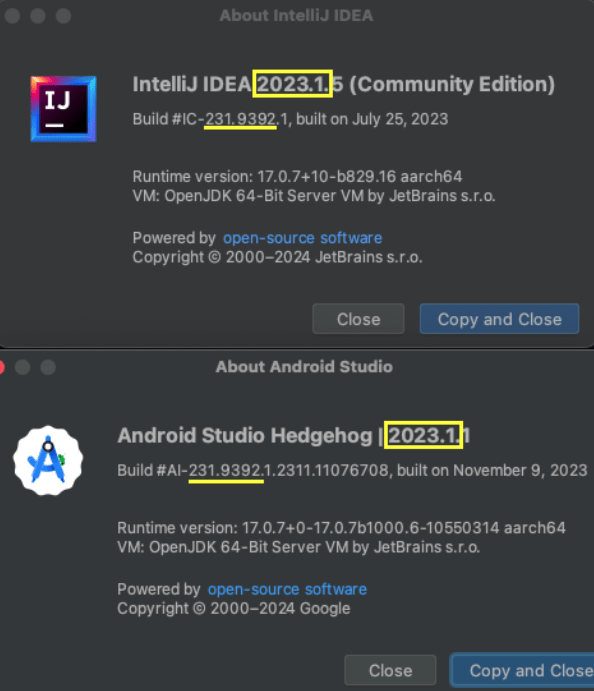
SETUP
To ensure compatibility with the API, it’s crucial to align the version of the IntelliJ Platform APIs utilized for plugin development with the targeted version of Android Studio. Knowing that, make sure IntelliJ and Android Studio versions are compatible, as shown below:
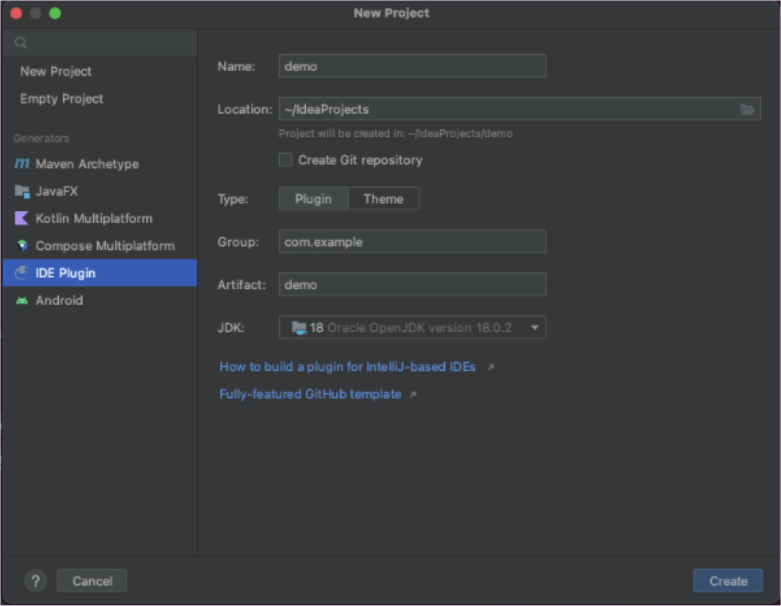
CREATE NEW PLUGIN
To start, create a new project. In the project setup window, choose the “IDE Plugin” option from the menu on the left side, then enter the necessary information as demonstrated in the image below:
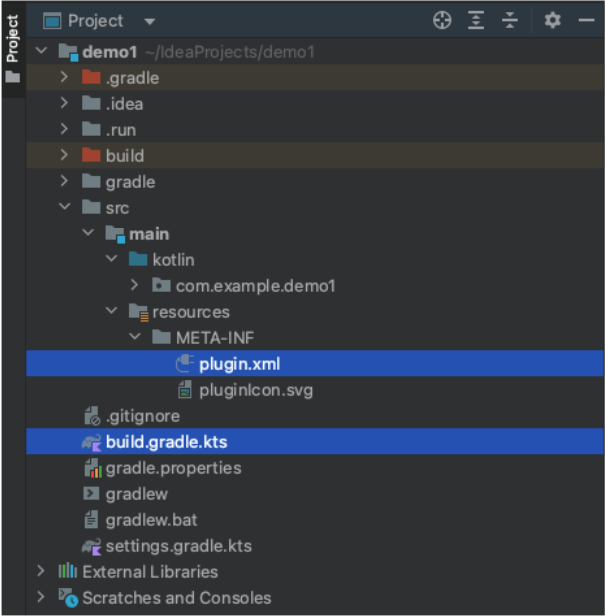
KEY FILES
You will end up with build.gradle and plugin.xml files.
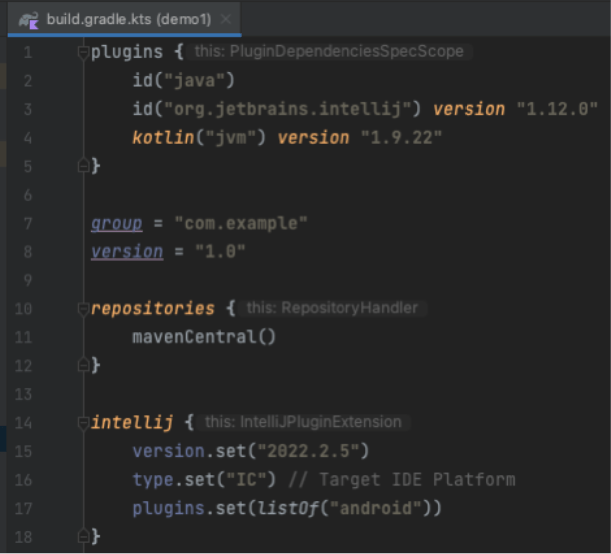
The build.gradle.kts file is where you’ll find all the settings for building your project. You might be familiar with Android development if you’ve worked on it before. Think of it as the equivalent of the build.gradle.kts file in an Android project. Gradle, the build tool, uses this file to understand how to compile and assemble your project. Here, you can specify the steps and configurations needed to build your project successfully.
In the intellij section edit field plugins.set(listOf(/* Plugin Dependencies */)) and put “android” in the list, like that: plugins.set(listOf(“android”)). Also, update Kotlin and any other library on the top of the file, if IDE is recommending so. As of writing this post, I am using this configuration:
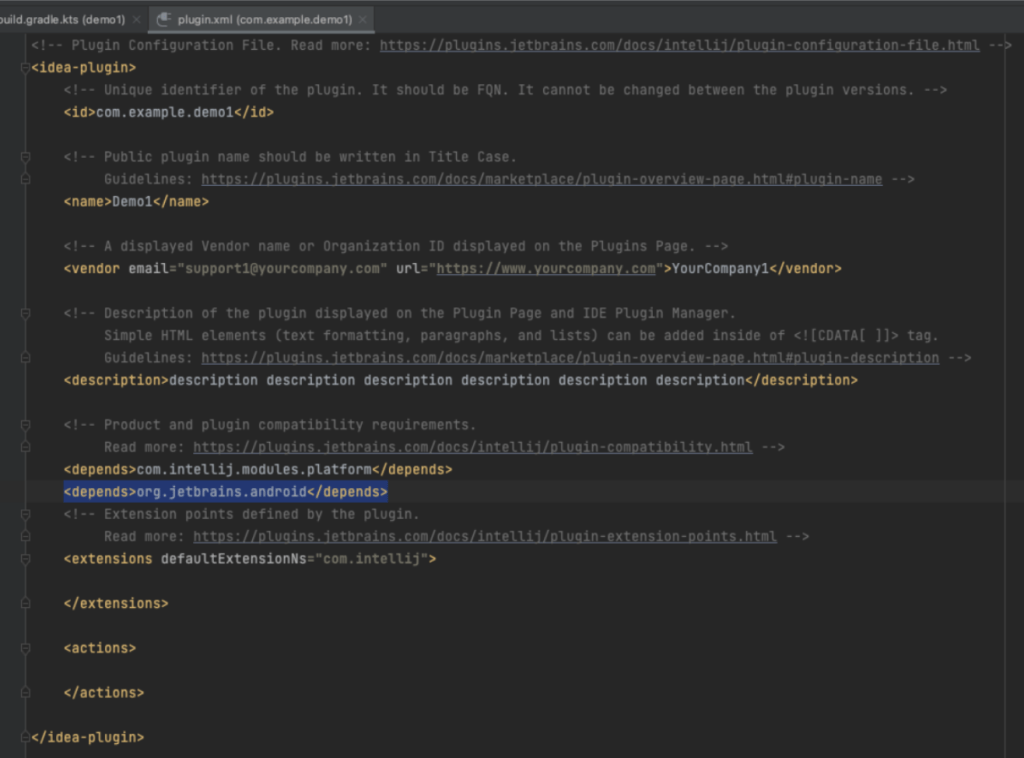
The plugin.xml file serves as a configuration file containing essential details about the plugin, such as its components and actions. Here, you can edit project information that is available on its market page (or in local installation).
After <depends>com.intellij.modules.platform</depends> it’s needed to add <depends>org.jetbrains.android</depends>, like this:
CREATE FIRST ACTION
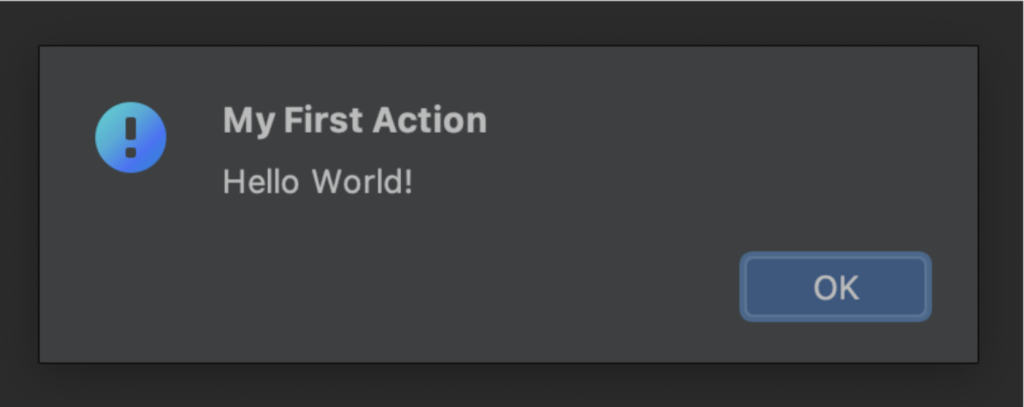
In the beginning, let’s create a classic “Hello World!” notification to see if the plugin compiles and can be run on your Android Studio.
In your leading directory, create a new action file, as shown on the screen:
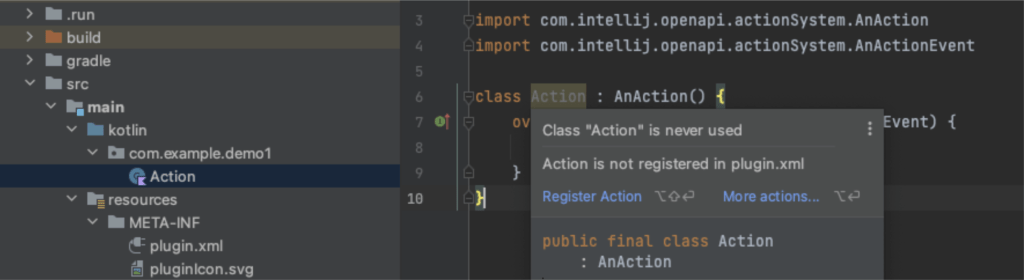
Make sure that your class inherits from AnAction, then implement its members. You will notice that your class “is not registered in plugins.xml”, let’s click on “Register Action”, and a window will appear:
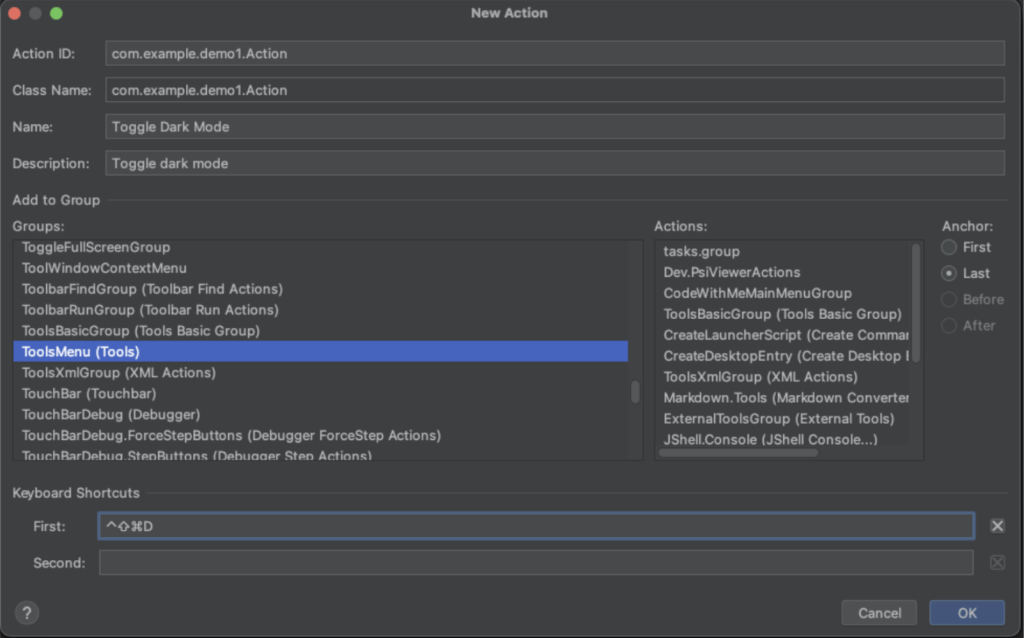
After adding the name, description, group where it’s placed, and keyboard shortcut, click OK and go to the plugin.xml file.
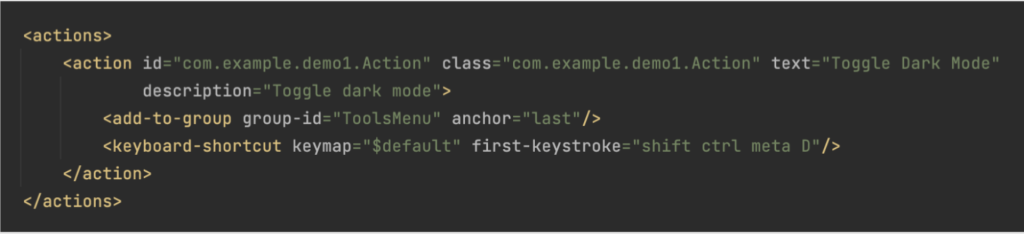
Here, you can check or edit your action settings. Now go back to your action class and edit it so it shows the “Hello World!” message:
class Action : AnAction() {
override fun actionPerformed(event: AnActionEvent) {
Messages.showMessageDialog(
event.project,
“Hello World!”,
“My First Action”,
Messages.getInformationIcon())
}
}
Now, build your plugin, open Android Studio, go to Settings -> Plugins, click the cog icon, and install the plugin .jar file from the disc. Its location is in your IntelliJ project /build/libs. Re-launching Android Studio might be needed.

After that, check the Tools menu to see if a new action is present, then click it or use the keyboard shortcut assigned to it.
DARK MODE
In the terminal, when you have a device running, executing the command “adb shell cmd uimode night” will result in the output “Night mode: no” (or yes); we want to read that line to determine if we are toggling night mode on or off. To do so, we need to create a single line receiver:
class SingleLineReceiver(val processFirstLine: (response: String) -> Unit) : MultiLineReceiver() {
private var cancelled = false
override fun isCancelled(): Boolean = cancelled
override fun processNewLines(lines: Array<out String>?) {
lines?.getOrNull(0)?.let { firstLine ->
processFirstLine(firstLine)
cancelled = true
}
}
}
This code will read the first line of the output, it needs to be used in “device.executeShellCommand” method, which means, we need to get a list of running devices. Let’s do it in “actionPerformed” method in our action class, but remove the hello world notification first.
val devices = event.project?.let { project ->
AndroidSdkUtils.getDebugBridge(project)?.devices
}
After obtaining the list of devices, we can execute a shell command on each.
devices?.forEach { device –>
device.executeShellCommand(“cmd uimode night”, SingleLineReceiver { firstLine ->
if (firstLine == “Night mode: no”) {
darkModeOn(device)
} else {
darkModeOff(device)
}
})
}
Calling executeShellCommand makes the “adb shell” part of the command not necessary, then this checks if “cmd uimode night” returns “Night mode: no” – if so, darkModeOn or darkModeOff methods are called:
fun darkModeOn(device: IDevice) {
device.executeShellCommand(“cmd uimode night yes”, NullOutputReceiver())
}
fun darkModeOff(device: IDevice) {
device.executeShellCommand(“cmd uimode night no”, NullOutputReceiver())
}
Now, a dark mode toggle plugin is ready after building and installing.
TOGGLE SHOW LAYOUT BOUNDS
This part is almost the same as the previous one: create a new class, inherit from AnAction(), register action in plugin.xml, set some keyboard shortcuts, and execute a shell command. The code looks like this:
class LayoutBounds : AnAction() {
override fun actionPerformed(event: AnActionEvent) {
val devices = event.project?.let { project ->
AndroidSdkUtils.getDebugBridge(project)?.devices
}
devices?.forEach { device ->
device.executeShellCommand(“getprop debug.layout”, SingleLineReceiver { firstLine ->
if (firstLine.toBoolean()) {
layoutBoundsOn(device)
} else {
layoutBoundsOff(device)
}
})
}
}
}
fun layoutBoundsOn(device: IDevice) {
device.executeShellCommand(
“setprop debug.layout true ; service call activity 1599295570”,
NullOutputReceiver()
)
}
fun layoutBoundsOff(device: IDevice) {
device.executeShellCommand(
“setprop debug.layout false ; service call activity 1599295570”,
NullOutputReceiver()
)
}
getprop debug.layout returns true or false depending on whether we are currently showing layout bounds SingleLineReceiver tells us about that output, and then we use setprop instead of getprop to set that property to true or false. In the same line, we execute the second command service call activity 1599295570, which refreshes anything we changed in the “developer options” settings. 1599295570 is a value of the SYSPROPS_TRANSACTION field.
CREATE TOOL WINDOW
Let’s create a class that inherits from ToolWindowFactory, include it in the extensions section in plugin.xml, and implement its members:
class PluginToolWindowFactory : ToolWindowFactory {
override fun createToolWindowContent(project: Project, toolWindow: ToolWindow) {
val contentPanel = JPanel(VerticalFlowLayout(FlowLayout.LEFT))
val scrollPanel = JBScrollPane(contentPanel)
scrollPanel.verticalScrollBarPolicy = JBScrollPane.VERTICAL_SCROLLBAR_AS_NEEDED
scrollPanel.horizontalScrollBarPolicy = JBScrollPane.HORIZONTAL_SCROLLBAR_AS_NEEDED
val contentFactory = ContentFactory.getInstance()
val windowContent = contentFactory.createContent(scrollPanel, “”, false)
toolWindow.contentManager.addContent(windowContent)
}
}
Most of the code is self-explanatory:
contentPanel – container where we will add our views, each added view will be below the previous one, as it is vertical.
scrollPanel – parent-container for contentPanel, which allow scrolling view in all directions.
windowContent – parent-container for tool window, which contains all of the above.
and in plugin.xml:
<extensions defaultExtensionNs=”com.intellij”>
<toolWindow
icon=”AllIcons.Actions.Lightning”
id=”DEMO LAYOUT HELPER”
factoryClass=”com.example.demo1.PluginToolWindowFactory”
/>
</extensions>
icon – The resource path of the icon displayed on the toolwindow button. ToolWindow icons must have a size of 13×13 pixels. Optional: I picked the yellow lightning icon.
id – Required, visible name of the tool window.
factoryClass – Required, the path to out ToolWindowFactory class.
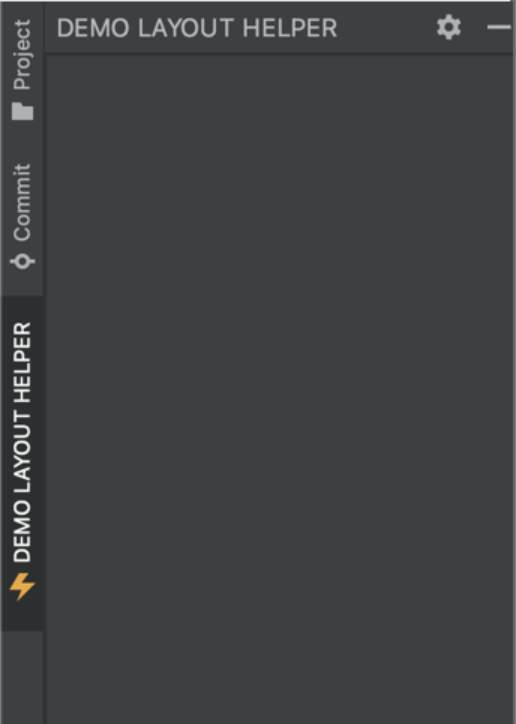
This is what our empty panel looks like. If the top left corner is not suitable for you, you can move it to any edge of the IDE.
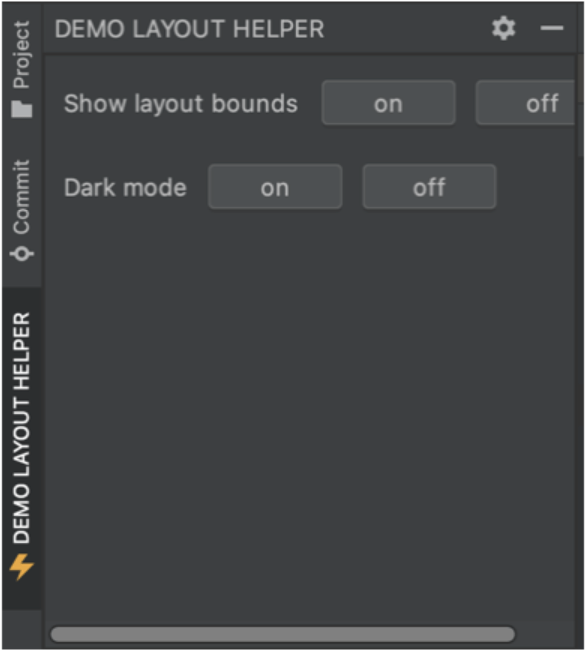
ADD PANELS TO TOOL WINDOW
object DarkModePanel {
fun addDarkModePanel(project: Project): JPanel {
val darkModePanel = JPanel(FlowLayout(FlowLayout.LEFT))
darkModePanel.add(JLabel(“Dark mode “))
val onButton = JButton(“on”)
onButton.addActionListener { onButtonClick(project, true) }
darkModePanel.add(onButton)
val offButton = JButton(“off”)
offButton.addActionListener { onButtonClick(project, false) }
darkModePanel.add(offButton)
return darkModePanel
}
private fun onButtonClick(project: Project, show: Boolean) {
val devices = AndroidSdkUtils.getDebugBridge(project)?.devices
if (!devices.isNullOrEmpty()) {
devices.forEach { device ->
try {
if (show) {
darkModeOn(device)
} else {
darkModeOff(device)
}
} catch (_: Exception) {
}
}
}
}
}
The addDarkModePanel function creates a JPanel to hold our dark mode controls. It adds a label “Dark mode” along with two buttons: turn dark mode on and turn it off.
The onButtonClick function is called when either of the buttons is clicked. It retrieves the connected Android devices using Android SDK utils. Then, it iterates through each device, toggling dark mode on or off based on the button clicked.
Do the same for the “Show layout bounds”; change functions darkModeOn/Off for layoutBoundsOn/Off and add those panels to the contentPanel in ToolWindow:
val contentPanel = JPanel(VerticalFlowLayout(FlowLayout.LEFT))
contentPanel.add(LayoutBoundsPanel.addLayoutBoundsPanel(project))
contentPanel.add(DarkModePanel.addDarkModePanel(project))
ADD ALL REMAINING PANELS
Using the pattern already shown we create a panel, add buttons, and then attach actions to the buttons – we can do anything that ADB allows us to do. Not including dark mode and layout bounds, those are the remaining ADB functions used in this plugin:
fun setSystemFontScale(device: IDevice, scale: String) {
device.executeShellCommand(“settings put system font_scale $scale”, NullOutputReceiver())
}
fun setSystemDisplaySize(device: IDevice, displaySize: String) {
device.executeShellCommand(“wm size $displaySize”, NullOutputReceiver())
}
fun setWindowAnimationScale(device: IDevice, animationScale: String) {
device.executeShellCommand(
“settings put global window_animation_scale $animationScale”,
NullOutputReceiver()
)
}
fun setTransitionAnimationScale(device: IDevice, animationScale: String) {
device.executeShellCommand(
“settings put global transition_animation_scale $animationScale”, NullOutputReceiver()
)
}
fun setAnimatorDurationScale(device: IDevice, durationScale: String) {
device.executeShellCommand(
“settings put global animator_duration_scale $durationScale”,
NullOutputReceiver()
)
}
fun hwuiRenderingBarsOn(device: IDevice) {
device.executeShellCommand(
“setprop debug.hwui.profile visual_bars ; service call activity 1599295570”,
NullOutputReceiver()
)
}
fun hwuiRenderingBarsOff(device: IDevice) {
device.executeShellCommand(
“setprop debug.hwui.profile off ; service call activity 1599295570”,
NullOutputReceiver()
)
}
Knowing all of that, in addition to just buttons, we can add some JTextField and confirm buttons to input data manually:
val textField = JTextField()
fontSizePanel.add(textField)
val customButton = JButton(“Set custom”)
customButton.addActionListener { onFontButtonClick(project, textField.text) }
fontSizePanel.add(customButton)
SUMMARY
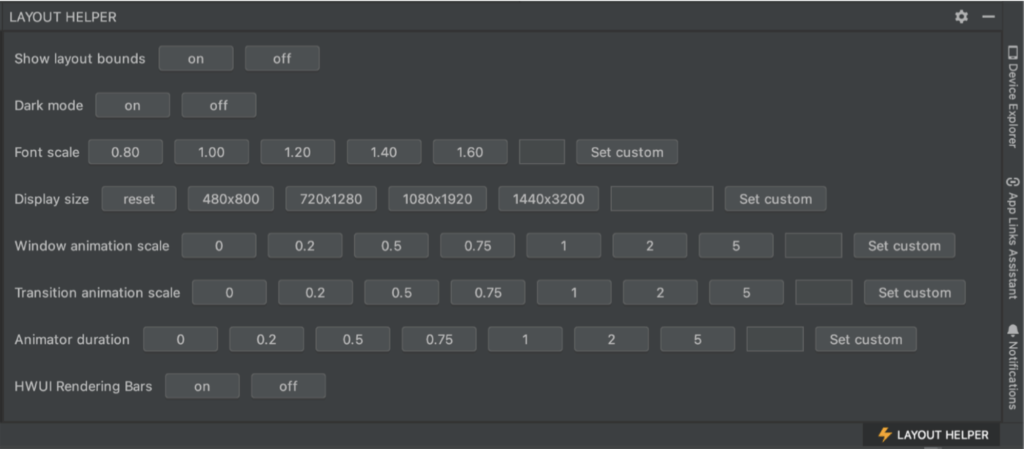
With a plugin prepared this way, we do not have to go to the smartphone or emulator settings to change something while working. We can change the options we are interested in with one click, especially when we are working on layouts and want to check how different font sizes look in the views we create, compare dark mode with light mode for a given screen, or check in more detail the animations and transitions between screens we have made. With a small amount of work, we can make development more accessible for ourselves and other developer colleagues and simplify checking various cases for our manual testers if they use Android Studio when clicking through the application.
BONUS – PUBLISHING PLUGIN TO MARKETPLACE
I was amazed at how easy that was; I just followed simple instructions from the official page.
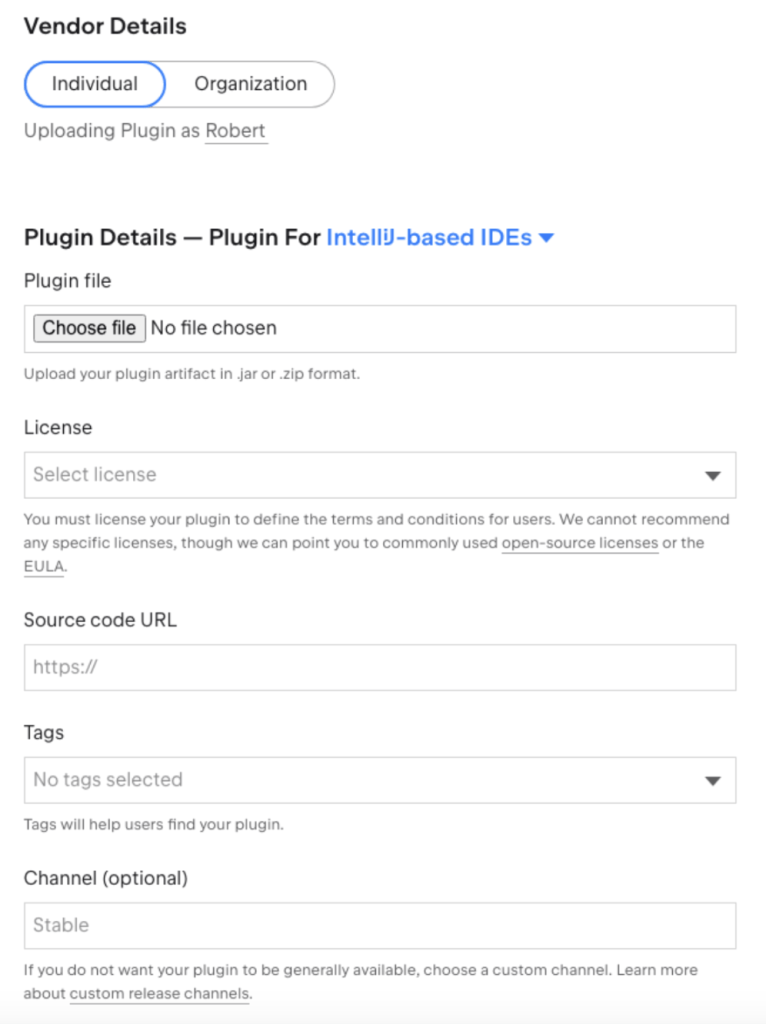
I just needed to create an IntelliJ account, then click on Upload Plugin, provide some information, pick a license, attach a link to the source code, upload the plugin .jar file, and voilà! Make sure you create a .svg icon, override the existing one (with the same name), and build a plugin with that new icon before publishing the .jar file.
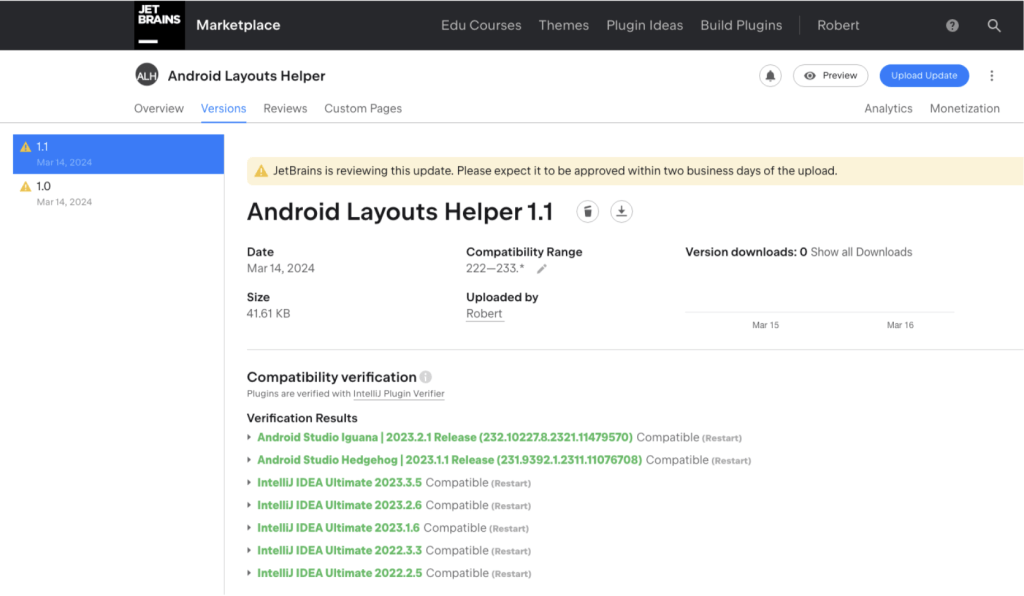
The page of your plugin after the upload is also really straightforward. You can check automatic compatibility verification results, request auto verification for a specific implementation of IntelliJ or Android Studio, add an update, check reviews and analytics, add monetization, or manage screenshots/videos of your plugin page.