Let’s have some fun with Fonts: part 3

This article is the third part of the series that will smoothly introduce the topic of fonts to you.
The previous part can be found here.
In this part, we will look into a magical world of shaders.
Gradients ?
We didn’t look much into setting text color in previous parts since it is super easy. Just pass it to Text composable:
Text(text = demoText, color = Color.Blue) If color is not provided, Text will try to take it from TextStyle or from the theme. But there is more to it. In the previous part, we used SpanStyle to enable font ligatures, this time, we will use to provide Brush, which will be responsible for rendering text.
@Composable
fun GradientFont() = Column {
    val brush = remember { Brush.linearGradient(colors = rainbowColors) }
    RenderText(brush, lines = 6)
}

@Composable
private fun RenderText(brush: Brush, lines: Int = 4) {
    val text = buildAnnotatedString {
        withStyle(ParagraphStyle(lineHeight = 12.sp)) {
            append((demoText + "n").repeat(lines).trim())
        }
    }
    Text(
        text = text,
        fontFamily = shaderFont,
        style = TextStyle(brush = brush),
    )
}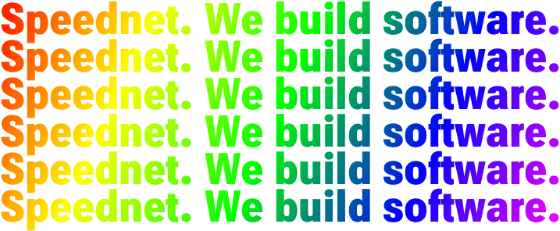
Here we create a linear gradient brush and use it in TextStyle. This is equivalent to setting a Shader/LinearGradient on regular TextView#paint. The default behavior for that gradient is to start drawing at the top left corner and end at the bottom right one. We can achieve more effects using the exact size and TileMode.
@Composable
fun GradientFontTileMode() = Column {
    val width = LocalDensity.current.run { 40.dp.toPx() }

    RenderText(remember { gradientBrush(width, TileMode.Clamp) }, 1)
    RenderText(remember { gradientBrush(width, TileMode.Mirror) }, 1)
    RenderText(remember { gradientBrush(width, TileMode.Repeated) }, 1)
    RenderText(remember { gradientBrush(width, TileMode.Decal) }, 1)
}

private fun gradientBrush(pxValue: Float, tileMode: TileMode) =
    Brush.linearGradient(
        start = Offset(0f, 0f),
        end = Offset(pxValue, 0f),
        colors = rainbowColors,
        tileMode = tileMode,
) 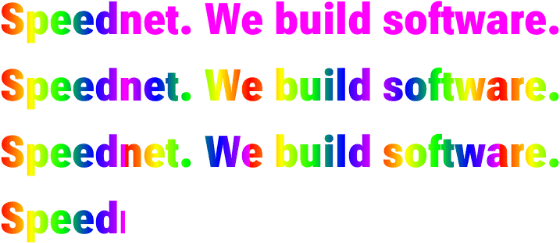
You should pick the proper mode based on what is your shader pattern. Here best one is most likely the mirror one. In the next example, we will use a repeated.
More shades ?
@Composable
fun BitmapFont() = Column(Modifier.background(Color.Black)) {
    val resources = LocalContext.current.resources

    val brush = remember {
        val bitmap = BitmapFactory
            .decodeResource(resources, R.drawable.pattern)
            .asImageBitmap()
        val shader = ImageShader(bitmap, TileMode.Repeated, TileMode.Repeated)

       val transform = Matrix()
        transform.postScale(0.4f, 0.4f)
        shader.setLocalMatrix(transform)

       ShaderBrush(shader)
    }
    RenderText(brush)
} 
This shows the usage of ImageShader (BitmapShader in old graphics). Working with the Shader class directly gives us the ability to transform it using Matrix, here, I wanted an image bit smaller than the original.
What we also combine shaders together.
@Composable
fun ShadersComposition() = Column {
    if (Build.VERSION.SDK_INT < Build.VERSION_CODES.Q) return

    val resources = LocalContext.current.resources
    val pxValue = LocalDensity.current.run { 60.dp.toPx() }

    val brush = remember {

        val imageShader = ImageShader(
            BitmapFactory.decodeResource(resources, R.drawable.cheetah_tile)
                .asImageBitmap(), TileMode.Mirror, TileMode.Repeated
        )

        val blackColorShader = LinearGradientShader(
            from = Offset(0f, 0f),
            to = Offset(1f, 1f),
            colors = listOf(Color.Black, Color.Black),
            tileMode = TileMode.Clamp,
        )

        val grayImageShader = ComposeShader(
            imageShader,
            blackColorShader,
            BlendMode.SATURATION
        )

        val gradientShader = LinearGradientShader(
            from = Offset.Zero,
            to = Offset(0f, pxValue),
            colors = rainbowColors,
            tileMode = TileMode.Mirror,
        )

        val shader = ComposeShader(grayImageShader, gradientShader, PorterDuff.Mode.MULTIPLY)
        ShaderBrush(shader)
    }
    RenderText(brush)
} 
In this example, we are using ComposeShader class to join two shaders, a third param is a mode of how we combine them. From Android Q, we can use a BlendMode, which offers few more options than PorterDuff.Mode. What we are doing here is blending the image we saw before with black color using a saturation blend that gives us a shader grayscale image. Then we apply rainbow shader with multiply mode to create the final effect.
RuntimeShader magic ?
Previously we used word shader without any thought on what it is. In computer graphics, shaders are divided into two groups 2D and 3D. As Android Developers, we are interested in 2D ones and shaders that we already used were pixel shaders, also known as fragment shaders, wiki states:
Pixel shaders, also known as fragment shaders, compute the color and other attributes of each "fragment": a unit of rendering work affecting, at most, a single output pixel. The simplest kinds of pixel shaders output one screen pixel as a color value; more complex shaders with multiple inputs/outputs are also possible. Pixel shaders range from simply always outputting the same color, to applying a lighting value, to doing bump mapping, shadows, specular highlights, translucency and other phenomena.
Our samples were doing precisely that they provided a color of the pixel for every pixel that we rendered. For example, gradient shader uses math to interpolate provided colors and calculate shade of the color for every pixel drawn. You might be worried that those small programs are expensive operations, but in reality, everything that we render is a shader and GPUs are crafted for precisely that.
In Android T (API level 33), we got an exciting possibility to be able to write those small programs and be able to do some extraordinary things like Rebecca showed in her post. Let’s see what we can do with fonts!
private const val SHADER_COLOR = """
    uniform float2 iResolution;
    half4 main(float2 fragCoord) {
      float2 scaled = fragCoord/iResolution.xy;
      return half4(scaled, 0, 1);
   }
"""

@Composable
fun ShaderFont() = Column {
    if (Build.VERSION.SDK_INT < Build.VERSION_CODES.TIRAMISU) return

    val shader = remember { RuntimeShader(SHADER_COLOR) }
    val brush = remember { ShaderBrush(shader) }

    RenderText(
        brush,
        modifier = Modifier.onSizeChanged {
            shader.setFloatUniform(
                "iResolution",
                it.width.toFloat(),
                it.height.toFloat()
            )
        },
    )
}
Let’s break down what we have here. First, we define our GPU program, it’s written in AGSL, which is quite similar to GLSL, which is used by Open GL. AGSL, on the other hand, is used by Skia, which is a 2D rendering graphics library used by Android (also by Chrome, Compose Desktop, Flutter and many more). Next, we create a RuntimeShader that will later become our brush. So, it works in a similar manner as previous examples.
Our application code can communicate with shader code by updating variables marked as uniform. Here we need to notify the shader what is the size of our component, so we use shader#setFloatUniform method to do that.der what is the size of our component, so we use shader#setFloatUniform method to do that. That allows animating them!
private const val SHADER_ANIM_COLOR = """
    uniform float2 iResolution;
    uniform float iTime;
    uniform float iDuration;

   half4 main(in float2 fragCoord) {
      float2 scaled = abs(1.0-mod(fragCoord/iResolution.xy+iTime/(iDuration/2.0),2.0));
      return half4(scaled, 0, 1.0);
    }
"""

@Composable
fun ShaderFontAnimated() = Column {
    if (Build.VERSION.SDK_INT < Build.VERSION_CODES.TIRAMISU) return

    val shader = remember {
        RuntimeShader(SHADER_ANIM_COLOR)
            .apply { setFloatUniform("iDuration", DURATION) }
    }
    val brush = remember { ShaderBrush(shader) }

    val infiniteAnimation = remember {
        infiniteRepeatable<Float>(
            tween(DURATION.toInt(), easing = LinearEasing),
            RepeatMode.Restart
        )
    }
    val timePassed by rememberInfiniteTransition().animateFloat(
        initialValue = 0f,
        targetValue = DURATION,
        animationSpec = infiniteAnimation
    )
    shader.setFloatUniform("iTime", timePassed)

    RenderText(
        brush = brush,
        modifier = Modifier
            .onSizeChanged {
                shader.setFloatUniform(
                    "iResolution",
                    it.width.toFloat(),
                    it.height.toFloat()
                )
            }
            .alpha(1 - (timePassed + 1) / 1000 / DURATION),
    )
}-2 (2).gif)
This implementation uses a composed animation mechanism to inform the shader about time-lapse. It might be a bit naive implementation and uses a hack to slightly change text alpha to force rerender of the text, and we will get back to it another time ?
Additional information:
- Shaders and AGSL https://developer.android.com/develop/ui/views/graphics/agsl/using-agsl
- Shaders on compose desktop https://www.pushing-pixels.org/2021/09/22/skia-shaders-in-compose-desktop.html and https://www.pushing-pixels.org/2022/04/09/shader-based-render-effects-in-compose-desktop-with-skia.html. It is primarily applying also to Android.
- Usage of render effects https://medium.com/androiddevelopers/making-jellyfish-move-in-compose-animating-imagevectors-and-applying-agsl-rendereffects-3666596a8888
Check a code here.


